Corel has undertaken a big challenge in trying to squeeze a pro-level photo management application into a market crowded with heavy hitters. At first look, you might be tempted to compare AfterShot Pro to Adobe’s Lightroom and Apple’s Aperture. But I think a more fitting comparison is to Adobe’s Bridge and Camera Raw (both adjuncts to Adobe Photoshop and the Creative Suite) for managing and editing images. Corel provides similar flexibility, but in a more integrated environment.
Raw shooters who use a variety of cameras and workflows may also consider augmenting their existing workflows with AfterShot because it provides features not available in their primary applications. Either way, it’s certainly worth a closer look.
 Instead of importing images into AfterShot, you point the application to their location.
Basic interface
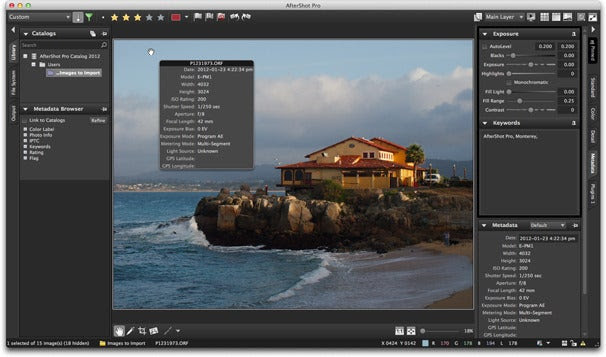
Getting around in AfterShot is fairly intuitive. The adjustment tools are in the right column and the file system is on the left. In the middle you can toggle between Thumbnail, Standard (image plus thumbnails), and Image views using the icons in the upper right corner. If you want to focus your attention on the image itself, the side columns are easily hidden using the L and R keyboard shortcuts.
A set of tabs run vertically down the outside edges so you can display different tools in the respective columns. Even though AfterShot is not completely customizable, there are enough options to shape the interface to your preferences.
Importing images
You don’t really import images into AfterShot; instead, you point the application to where they reside.
Corel says that, “Unlike other workflow tools, AfterShot Pro does not force you to import your images into a catalog just to work with them. You are free to access your photos in existing folders, on a network or on a memory card.” This works well if you want to focus on a few specific photos. But it may feel cumbersome if you want to establish an efficient workflow for an entire shoot. This would be especially true for iPhoto, Aperture, and Lightroom users who are used to working in a more structured environment.
Lightroom and Aperture, for example, provide a robust importing tool that streamlines the transfer process. If you want the same results with AfterShot, It requires two steps. First, you copy to files from a memory card to your Mac or an external hard drive. Then you enable the Import Photos from Folder command to add them to an AfterShot catalog. At this point you can manage the images in a similar manner that you would with other pro apps.
Where the AfterShot gets interesting is when you don’t really want to import the entire set of images, but rather choose a few, edit them, then save them out to another location. Let’s say after a photo shoot you want to quickly deliver a few samples to the client, but don’t necessarily want to catalog the entire project. By using the Open File command, you can browse files on the memory card, connected hard drive, or even a network drive. I tried all of these scenarios, including accessing images on my Pogoplug drive, and it worked great. I edited the raw files, then saved them to a different location. The originals were left untouched. AfterShot did, however, create XMP files with the editing instructions and added them to the same directory as the original raw files.
Combine this approach with a robust set of image editing tools, and AfterShot could prove handy for shooters on tight deadlines who need a lot flexibility in how they work. The improvement I would add to this approach is the ability to scale the thumbnails bigger when viewing them via the Open File command. This would make it easier to select the specific images you want to edit.

The AfterShot Pro interface with the EXIF pop-up menu in view.Image editing
AfterShot features a comprehensive set of image editing tools. The controls are organized under four different tabs in the right column: Standard, Color, Detail, and Plugins (if you have any loaded). If you prefer to work with mostly basic tools, the Standard tab will probably serve as your primary resource. All of the usual suspects are located there, including exposure, white balance, vibrance, sharpening, and many more. But there are a few pleasant surprises too.
Corel has included Perfectly Clear technology that automatically adjusts lighting at the pixel level. The effect is often like wiping clean a dirty window. Once you apply Perfectly Clear, you can adjust the effect to your own tastes using the other tools. Personally, I like to tone it down a bit, but that’s easily done using layer control.
Yes, you read right: layers. Click on the Open Layer Management icon in the upper right corner of the interface, and add non-destructive editing layers to your document. They are very easy to use, and quite powerful. You can turn layers on and off, and adjust the opacity for each layer. For example, I would use Perfectly Clear on its own layer, and then tone it down using the opacity control.
Another wonderful surprise is Noise Ninja integration. There’s just a single slider control in this tab, but there are more adjustments available if you click over to the Detail tab. The only downside to this is that you need a Noise Ninja license ($80) to access the more advanced controls. (I have a Noise Ninja license for Aperture, and AfterShot found it automatically and unlocked its advanced features.) But its basic use is included with AfterShot, and no roundtripping is required.
I was disappointed with the Sharpness slider, which appears quite basic, especially by current standards. So you have to be careful with it as not to introduce unsightly artifacts. The Highlight recovery slider also seemed a bit anemic. I’m used to being able to pull more detail out of highlight areas in my raw files. I’d also like to see sliders for gamma and clarity. These are not included in the Standard set.
Click on the Color tab, however, and you do get curves controls along with plenty of color correction and color balance sliders. I was able to adjust the midtones to my liking using curves, so that help offset my earlier complaint about the lack of a gamma slider.

Non-destructive layers are very easy to use and quite powerful.The Detail tab also has lots of goodies. Corel has included lens correction with a substantial database of cameras and lenses. This allows you to fix distortion, chromatic aberration, and vignetting. There were profiles for the Olympus E-PM1 and its standard 14-42mm zoom that I was using to test this application. The list of cameras and lenses seem fairly comprehensive.
In addition to the aforementioned global tools, AfterShot Pro includes selective editing cursors, healing and cloning tools, and the ability to manage multiple versions of a photo. Overall, you have a robust set of image editing tools at your disposal.
Output
Basic output options include batch processing via the Output tab in the left column of the interface, or using the Save As command under the File menu. Either approach presents you with a comprehensive dialog box that allows you to select format, size, file renaming, IPTC data options, and even output sharpening. File types for export are limited to JPEG and TIFF, although you do have a choice between 8- or 16-bit for TIFF output.
The print dialog box is straightforward and provides a decent set of options, including multiple prints on a single sheet of paper.

AfterShot Pro includes plenty of export options, including output sharpening.File management
For those who want to manage photos within AfterShot Pro, there are plenty of familiar tools to do so. Star ratings are easily applied by clicking on the star icons in the top toolbar, on the thumbnail itself, or via keystroke using the numbers 1-5. (Star ratings in my imported photos from Aperture were also honored in AfterShot Pro.) Color labels and flags are also simple to apply.
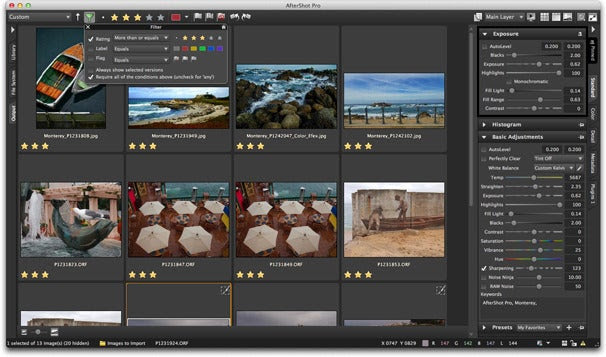
Once images are marked, they can be sorted using the Filter Tool represented by the funnel icon in the top toolbar. This helps to whittle down a large library of images to the few you’re interested in, especially when combined with keyword search.
For example, you could view all of your 3-star images using the filter tool, and then enter a keyword in the search box (right below the Catalogs label in the upper left corner) to further refine the results.
Unfortunately, once you have those results, there isn’t an easy way to retain them in a virtual collection for reference later. You could put them in a stack that can be opened and closed as needed. But this feels like a workaround compared to having the option to create user collections. If you depend a lot on Albums in Aperture or Collections in Lightroom, you’ll miss this feature.

Marked images can be sorted using the Filter Tool represented by the funnel icon in the top toolbar.Other goodies
The magnifier tool (View -> Magnifier) is helpful for inspecting image detail. Users can set both the zoom level and size of the loupe. Clipping warning can be toggled off and on (View -> Toggle Clipping Warning) to show areas of detail loss in shadows and highlights. By pressing the E key, you can toggle off and on a floating EXIF viewer that allows you to see camera metadata at any time. And if you want to display your images via a slideshow, you can customize the presentation using the built-in tool. It’s for viewing only, however, because there’s no ability to export as a movie.
The plug-in architecture allows you to expand the application’s capabilities without having to roundtrip to another app (and deal with a second, often larger file). I tried the Vigne-Advanced Vignetting tool, and it was easy to install using the Install Plugin command. It then appeared under the Plugins tab on the right column.
Raw file support
AfterShot Pro supports most raw formats including ARW, CR2, CRW, DCR, DNG, MRW, NEF, NRW, ORF, PEF, RAW, RW2, RWL, SR2. If your current editor doesn’t support a format you need, such as Canon sRAW, then AfterShot could be worth the price for its raw decoding alone. You can
see the entire list on its Tech Specs page.
Macworld’s buying advice
Corel’s AfterShot Pro isn’t refined enough yet to seriously challenge Lightroom and Aperture. But it can augment them. Its implementation of layers is very easy to use. And the ability to decode and edit image files without having to copy them into a library can be very handy at times. The application runs quite fast on laptops, even when working with raw files. And goodies such as lens correction, Noise Ninja, and Perfectly Clear are certainly enticing.
So, is AfterShot Pro worth the $100 download? That’s a tough call, considering you can get Aperture for $79. But if you’re a Bridge/Adobe Camera Raw user, or are intrigued by the features mentioned in this review, it’s worth a look via the 30-day free trial download. And if you are an Aperture, Lightroom, Bibble, or Paint Shop Pro license owner, you qualify for the $79 upgrade price. I’ve already taken advantage of that offer.


0 Responses to “Corel AfterShot Pro photo manager plays well in the big leagues”
Post a Comment