
Top Stories
_____________________________________________
 Fat Jump Pro (By SID On)Developer: SID On Price: $0.99 Version Reviewed: 1.2 Download: here Requirements: Compatible with iPhone, iPod touch, and iPad.Requires iOS 4.0 or later. Located in the Warsow,Poland-SID on an independent mobile application developer has announced a recent update of Fat Jump Pro for the iPhone,iPad and iPod touch.Fat Jump Pro is a fast paced vertical arcade action for the iOS devices.Using the tilt controls the player must guide the jumping,little green hero (a healthy and crispy cucumber) up a never ending series of platforms... |
|


Latest Stories
______________________________________________


Tuesday, 22 November 2011
How to manage multiple Macs at home
Do you like this story?
Controlling parental controls remotely
You’re familiar with what you can do with a parental-controlled account. What you may not know is that once you’ve created such an account, you can change its options from another Mac.When you first launch the Parental Controls system preference on a Mac you’re managing you see a Manage Parental Controls From Another Computer option. Enable this option and proceed to configure the parental controls for that account.
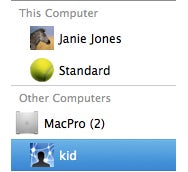
When you move to your Mac and launch Parental Controls, under the Other Computers heading within the Parental Controls window, you’ll spy the names of any Macs for which you’ve configured controlled accounts and enabled remote management. Click the Lock icon at the bottom of the window and enter your administrator’s password. Then select a computer whose controls you wish to configure. You’ll be prompted for an administrator’s name and password for that Mac (not for your own Mac). Enter each and click OK. All the controlled accounts on that remote Mac will appear. Select an account and you’ll find that you can adjust the account’s controls just as if you were sitting in front of that Mac. Additionally you can view that account’s log files.
Another operation you can perform remotely is approving the people your child communicates with. You can configure the People tab within Parental Controls so that whenever the user of the account attempts to send an email message or chat with someone not on the approved list, an email notification is sent to an account of your choosing. As long as you open that notification message with Apple’s Mail (it doesn’t work with other email clients) you can click an Always Allow button that then adds that address to the list of approved correspondents.
Keeping an eye out
If you and your child have separate Macs, you can watch his screen via OS X’s Screen Sharing feature. First, while sitting down in front of his Mac, log on to that Mac as an administrator and switch on Screen Sharing in the Sharing preference pane. In Allow Access For, select Only These Users, click on the plus-sign button, and choose Administrators.To observe, go back to your Mac, open a Finder window, locate the Shared entry in the sidebar, and look for the Mac your child is using. Select it and click the Share Screen button.You can now see what he’s doing on his Mac—and even control it. Your child can try to cut you off (by choosing Disconnect, and then your Mac’s IP address, from the Screen Sharing menu in the menu bar), but your Mac will immediately reconnect.
Screen Sharing with a child can be a delicate matter. No one likes to be spied on, but it can help keep your kid on the up-and-up if he or she understands that you have the option, at any time, to see what they’re doing.
Limiting the Internet
Parental Controls can do only so much. While you can employ it to keep your kids from using the computer at all during certain hours, it can’t be configured to block only their Internet access. For this kind of thing you must turn to your router and limit access via MAC address (the unique identifier address that all computers and iOS devices have). It’s done this way with an AirPort Extreme Base Station:Launch AirPort Utility, select your base station, and click the Manual Setup button. Select the AirPort tab at the top of the window and click the Access Control tab. From the MAC Address Access Control pop-up menu choose Timed Access. This is where you begin setting up limits.
Click the Plus button at the bottom of the pane, and in the sheet that appears enter the MAC address for the devices you want to limit (see “Blocking via MAC Address”). On an iOS device you’ll find this address by choosing Settings -> General -> About and locating the Wi-Fi Address Entry. On a Mac, hold down the Option key and select System Profiler (Snow Leopard) or System Information (Lion) from the Apple menu. When System Profiler appears, select Network and then in the Active Services column to the right, select the device used to connect to the Internet (AirPort or Ethernet). Search for the MAC Address entry in the results below.
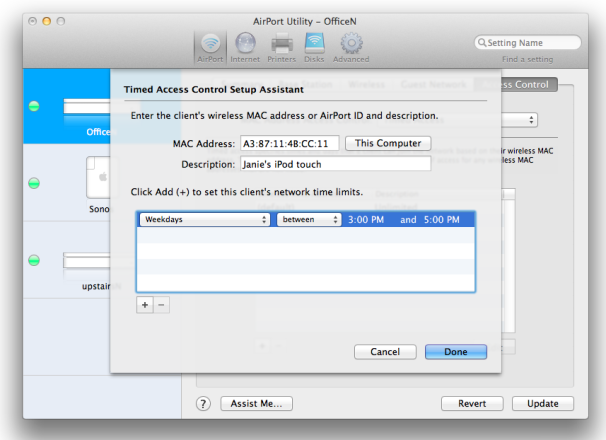
Blocking by MAC Address: With the aid of a wireless router such as an AirPort Extreme Base Station you can block devices’ Internet access.
Limiting online activities
Social networking sites such as Facebook are attractive for kids. It’s a place where they can establish an identity and hang out with their friends. But there’s the much-touted dark side: Kids often share too much, come in contact with strangers, and don’t know how to configure deliberately-opaque privacy settings.Parental Controls can help by allowing you to completely block Facebook and similar sites, but that’s a tough call with older kids. This is one situation where your best bet is parental involvement. If you’re going to let your kids have a Facebook account (Facebook’s rules require that users be 13 or older to have an account), learn how to configure its privacy settings so the least amount of information is shared (this includes blocking photos that your child appears in). Demand that your child "friends" you on Facebook so that you can keep an eye on their wall. And, without scaring them, let them know why they should be careful about sharing.
You should also be very careful about providing a child with the means for spending money on the Internet. They should absolutely not have your credit card number or an iTunes ID tied to a credit card. If you want to allow your child to spend money on iTunes, set up an iTunes allowance within the iTunes Store or give them a gift card.
Sharing media between multiple Macs
Thanks to the file sharing capabilities built into OS X and Lion’s new AirDrop technology, it’s not difficult to move files between Macs on a local network. It is, however, trickier to create a single repository for music, video, and image files that can be shared between these same Macs.Apple’s solution is the sharing options found in iTunes and iPhoto. To switch sharing on in iTunes, open the application’s preferences, click on the Sharing tab, and enable the Share My Library On My Local Network option (see “Legal Music Sharing”). Do this and you can choose to share your entire music library or just selected playlists. To share your iTunes library with iOS devices, choose Turn On Home Sharing in iTunes’ Advanced menu. When you do you’ll be prompted for your Apple ID and password. Your iTunes library will now be playable from an iOS device that is connected to your local network.
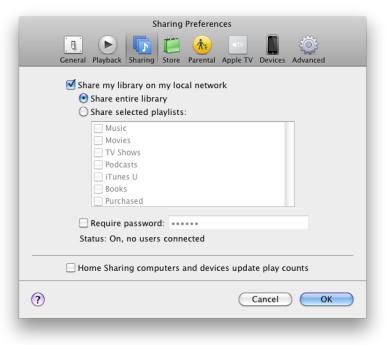
Legal Music Sharing: iTunes’ Sharing feature provides easy access to a house full of music.
Apple’s solution doesn’t solve the central repository problem, however, as each Mac has its own iPhoto and iTunes library—the family’s collection of media isn’t located in just one place. There are options for making it available, however.
One option is to set up a Mac as a media server—a Mac mini, for example, or an older Mac you’re no longer using. When you want to add media to the family collection, you place it on this computer and then access that media via iTunes’ and iPhoto’s sharing areas. If a dedicated Mac is unavailable or too much for the family budget, you could obtain a Network Attached Storage (NAS) device. Many of today’s NAS devices include features for sharing an iTunes and iPhoto library. Simply attach the NAS to your network, copy your media to its drive, and access that media from iTunes and iPhoto much as you’d access any other shared media in these applications.
It’s also possible that you already own the means for sharing iTunes media over the network—a recent AirPort Extreme Base Station or Time Capsule. Start by copying media to a hard drive attached to your AirPort Extreme (or the Time Capsule’s internal hard drive). For each computer you want to share media with open iTunes’ preferences, choose the Advanced tab, and disable the Copy Files To iTunes Media Folder When Adding To Library option. Within iTunes choose File -> Add To Library and navigate to the folder on the drive shared from your base station or Time Capsule. iTunes will add the names of the audio and video files it finds to the Mac’s iTunes library without actually copying the files to each Mac. Each connected Mac will be be able to play media within that folder and more than one Mac can play that folder’s media at the same time. (Playing different movies simultaneously on multiple Macs will be challenging unless you use a wired gigabit ethernet network.)
Backing it all up
You’ve heard it before and you’ll hear it again: It’s not a question of if your hard drive will die, but when. Each Mac in your home must be backed up if you care about your data. With Time Machine, individual Macs can be easily backed up to hard drives attached to those Macs. But that could mean purchasing multiple hard drives to outfit your herd of computers.The better solution is this instance is a network backup—a scheme where each Mac is backed up to a single device. Apple’s Time Capsule was built with exactly this in mind. Available in capacities of 2TB and 3TB (priced at $299 and $499 respectively), a Time Capsule is an easy-to-set-up solution, though not ideal if you have a lot of data to back up.
Another, more flexible option is an old Mac configured as a backup server (perhaps the same one you’ll use to store and stream your iTunes content). With an old Mac you can not only add exactly as much storage as you need in the form of internal and external hard drives, but you can choose to use software other than Time Machine—a program such as Econ Technologies’ $40 ChronoSync, for example. When used in league with the $10 ChronoAgent on each Mac, backing up multiple computers to a single Mac is a relative snap.
Online backup is another option. Though slow-going due to the time it takes to upload a lot of data, storing your most important files online offers the protection of an off-site backup. Although each user can upload files to a service such as Dropbox or a MobileMe iDisk (at least until June 2012, when MobileMe and iDisk cease to exist), dedicated services such as CrashPlan provide automatic in-the-background backup and can provide plans that allow you to upload an unlimited amount of data from up to 10 computers for as little a $6 a month, depending on the plan you commit to.
It’s manageable
At one time managing multiple accounts or, worse yet, multiple computers took the patience of a saint and the smarts and experience of an IT professional. That’s no longer the case. While it’s not yet the kind of thing you can do with your eyes closed, with some familiarity with the Mac OS and the hints you now have in hand, you too can control a home full of Macs.This article originally appeared as a Macworld Daily Reader iPad exclusive and is now available on bestipadgames.blogspot.com for your enjoyment.


This post was written by: Irfan Jam
Irfan Jam is a professional blogger, web designer and front end web developer. Follow him on Facebook


0 Responses to “How to manage multiple Macs at home”
Post a Comment