Top Stories
_____________________________________________
 Fat Jump Pro (By SID On)Developer: SID On Price: $0.99 Version Reviewed: 1.2 Download: here Requirements: Compatible with iPhone, iPod touch, and iPad.Requires iOS 4.0 or later. Located in the Warsow,Poland-SID on an independent mobile application developer has announced a recent update of Fat Jump Pro for the iPhone,iPad and iPod touch.Fat Jump Pro is a fast paced vertical arcade action for the iOS devices.Using the tilt controls the player must guide the jumping,little green hero (a healthy and crispy cucumber) up a never ending series of platforms... |
|
Latest Stories
______________________________________________
Thursday, 15 December 2011
Three quick iMessage tips
Do you like this story?
Though iMessage is useful from the get-go, a few tips can make the feature far better—though you’ll need to point your iMessage-using friends to this story as well to benefit the most.
Seeing Read

When you enable Read Receipts, your contacts can see when you’ve read their iMessages.
It sounds a smidgen creepy, but it’s really not. If my wife’s iPhone is in her purse, I know she sometimes doesn’t hear text messages arrive. Since she has Read Receipts enabled, however, I know when she’s seen my message. And since she knows I know, she needn’t respond to informational messages that merit no response beyond a simple “10-4,” like “I will be home ten minutes late” or “You are a charming and delightful ladyfriend.”
So do the iMessaging community a favor and turn on Read Receipts. Then get all your friends to, too. Here’s how: Launch the Settings app, then scroll down and tap on Messages. From there, slide Send Read Receipts into the On position.
Direct Address

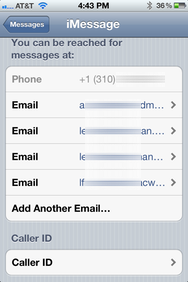
After you configure all your email addresses, set one as your iMessage Caller ID. That way, your messages can stay in sync between your iPhone and any other iOS devices you might own.
Apple will ask you to confirm any email addresses you add; the company sends you an email, and you select the link inside to prove that you really own the address in question.
This way, people with different email addresses for you can still reach out to you via iMessage, and all the messages you receive will go to the same place.
See some ID
Hold it right there. Your iPhone, I mean. Because just below the email addresses you just added in the Receive At settings is another option called Caller ID. You use it to dictate from whence it should appear that your iMessages are sent. On an iPhone, it can be your phone number, or any of the email addresses that you’ve linked to your iMessage account.My advice: Choose your main email address, instead of your phone number. That’s the ideal approach for anyone using an iPhone in tandem with another iOS device—like an iPad. Your iPad doesn’t have a phone number, and it can’t receive iMessages sent to your iPhone’s phone number. It can, however, show messages sent to (and from!) an iMessage-linked email address. So, by using an email address for your iMessage Caller ID, you can ensure that your messages are completely synced on all your iOS devices.
And when you compose new iMessages to your friends, make sure to use their email addresses (and not their phone numbers) when possible; that’ll ensure that they too see their messages synced between their devices.
via : Macworld

This post was written by: Irfan Jam
Irfan Jam is a professional blogger, web designer and front end web developer. Follow him on Facebook


0 Responses to “Three quick iMessage tips”
Post a Comment