
Top Stories
_____________________________________________
 Fat Jump Pro (By SID On)Developer: SID On Price: $0.99 Version Reviewed: 1.2 Download: here Requirements: Compatible with iPhone, iPod touch, and iPad.Requires iOS 4.0 or later. Located in the Warsow,Poland-SID on an independent mobile application developer has announced a recent update of Fat Jump Pro for the iPhone,iPad and iPod touch.Fat Jump Pro is a fast paced vertical arcade action for the iOS devices.Using the tilt controls the player must guide the jumping,little green hero (a healthy and crispy cucumber) up a never ending series of platforms... |
|


Latest Stories
______________________________________________


Tuesday, 22 November 2011
How to share one Mac?
Do you like this story?
Although you can configure this Mac so that it has just a single account, you can make it more enjoyable for each member of your family to use (and easier for you to control) by creating a separate user account for each family member. Do this and everyone has a place to put their stuff, plus you have the power to control exactly what each user can do with the Mac.
Configuring Users & Groups
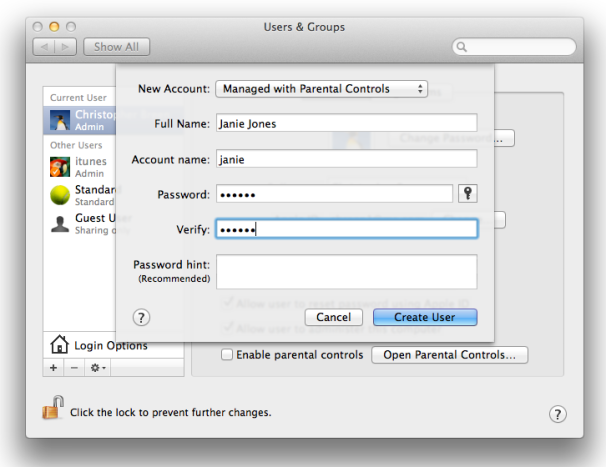
To create accounts on your Mac, launch System Preferences. If you’re running Lion, select the Users & Groups preference. On a Snow Leopard-or-earlier Mac, choose the Accounts preference. Click the lock icon at the bottom of the window and, when prompted, enter your administrator’s password and click the Unlock button. You’re now ready to add a new account.You do this by clicking the plus (+) button at the bottom of the user list. In the sheet that appears, enter the full name for the user you’re creating the account for (Susie Jones, for example), an account name (susie), a password (don’t use the same password for each account you create), and a password hint if you like.
From the New Account pop-up menu choose the kind of account you’d like to create. Your choices are Administrator, Standard, Managed With Parental Controls, Sharing Only, and Group. They break down this way:
- An Administrator account can control most of the Mac’s functions, including installing software, creating new accounts, changing passwords, and modifying and deleting a variety of files. This is the account you should have, but not one you should create for a child.
- A Standard account can operate the Mac normally but doesn’t have the kind of control that an administrator account has—a standard user can’t install software or create accounts, for example. The standard account isn’t a perfect compromise. On the one hand it does prevent this user from making the kind of changes that can muck up the Mac. But it can also prompt those mid-day “Mom, I can’t get on the network!” calls that require an administrator's password to troubleshoot.
- Managed With Parental Controls is the kind of account you would set up for a child or someone who’s brand-new to the Mac or computers in general (see “For the Children” below). With Parental Controls (which we’ll discuss later) an administrator can severely limit what a user can do as well as monitor that person’s actions.
- You’re unlikely to need either a Sharing Only or Group account on your family Mac. The Sharing Only account is one you create so that a remote user can access files you’ve chosen to share on the computer. A Group account is a special account that can be used by a subset of users who already have an account set up on the Mac—Dad, Mom, and Jackie, for example, but not the toddling twins, Lex and Jason.
For the Children: You create a parental-controlled account within Lion’s Users & Groups system preference.
Parental Controls
When discussing managing accounts on a family Mac, you’re almost always talking about using OS X’s built-in parental controls in one way or another. Parental controls allow you to limit the Mac in a variety of useful ways.Once you’ve created an account managed with parental controls, ensure that the Allow User To Administer This Computer option found in the Users & Groups/Accounts window is not enabled. Obviously, you’ve imposed parental controls so that you’re in charge of the Mac, rather than your ten-year-old. With the Enable Parental Controls option enabled, click the Open Parental Controls button. The Parental Controls window will appear.
Within this window you see five tabs—Apps, Web, People, Time Limits, and Other. Within the Apps tab you have three options—Use Simple Finder, Limit Applications, and Allow User To Modify The Dock.
Apps When you enable Use Simple Finder within the Apps tab the person using this account will have more limited access to the Finder. The Finder’s menu bar has fewer commands and the Dock bears only a My Applications folder, Documents folder, Shared folder, and Trash icon (along with any currently running applications). Items within these folders are presented in icon view and can be launched with a single click. There’s no option to view the contents of the Mac’s hard drive and no Go menu for navigating to other locations on the Mac. To expose the full Finder, the user needs an administrator’s password. This is an excellent setting for young children or users with simple needs who are brand new to the Mac.
Limit Applications lets you do just that (see “Limited for Your Protection”). Within Lion you can filter App Store applications by rating (Up To 9+, for example) as well as enable or disable specific applications (allow Pages, for instance, but not DVD Player). By default, users with these controlled accounts are not allowed to modify the Dock. Enable this final option to allow dock modification.

Limited for Your Protection: With Parental Controls you can choose exactly which applications your child can use.
Apple’s Internet filters are baked into the Mac OS, so they work with a variety of Web browsers. They’re also intelligent. Rather than blocking websites based on a blacklist of specific sites, websites are filtered based on their page content and structure. Sites will also be blocked if the website has voluntarily identified itself as being adult-oriented in nature using one of a couple of rating systems. But these filters aren’t perfect. If a site has little text or the text it has is in an uncommon language, it could slip by Apple’s filters. If, by examining the logs of a controlled user, you discover inappropriate sites among the log of visited sites, you can add them to the list of blocked sites or you can turn to a third-party security and filtering package.
Likewise, if a site uses SSL encryption (look for addresses that begin with https), the Internet filters won’t work. Under Lion, a Parental Controls window will appear when a person using a controlled account attempts to access secure websites. This window allows those with an administrator password to load the listed sites. If you don’t have such a password, click Cancel, the window disappears, and the browser stays on the current page. Regrettably, some of these websites are simply links to advertising sites so this window can be a common sight when an account has been configured to filter Internet content (see “Ad Links”).

Ad Links: Parental Controls prompts a dialog box like this when embedded links to secure sites appear on a webpage.
Time Limits Within the Time Limits tab you determine the hours in which the controlled account can use the Mac. You can separately impose weekday time limits, weekend time limits, and bedtime time limits. The first two limits are denoted by hours per day. So, for example, you might limit the account to two hours per day, Monday through Friday and three hours per day on weekends. The Bedtime option lets you determine the exact hours the computer can be used. For instance, on school nights the Mac could be open for business from 3 PM until 9 PM for that user. If you have the weekday or weekend time limits enabled, those limits work in league with the bedtime restrictions. So, a child could be allowed to compute for two hours total anywhere between 3 PM and 9 PM. After that, the account is shut down until the next day rolls around.
Other Finally, the Other tab contains these odds and ends—Hide Profanity In Dictionary, Limit Printer Administration, Limit CD And DVD Burning, and Disable Changing The Password. How you wish to limit the Dictionary and disc burning is up to you. The Printer and Password options should definitely be enabled for a young child. Note that allowing a controlled user to change their password isn’t as dangerous as it sounds. If your attitudinal teen decides to change his or her password without telling you, you’re not locked out. As an administrator you have the power to reset the password of any account on the Mac.
Monitoring a single Mac
When discussing matters of international security, you often hear the phrase “trust but verify” bandied about. This strategy can be just as important at home. Even though you’ve set down rules regarding what your kids can and can’t do with the computer, it doesn’t hurt to make sure that they’re following those rules. When using a single computer that’s not controlled by another, there’s no way to monitor, in real time, what a controlled user is up to other than sitting down next to them and watching what they’re doing. You can, however, see what they’ve done in the past.The means for doing this is the log files available within Parental Controls (see “Monitoring Logs”). You can access these files by clicking the Logs button found in Parental Controls' Apps, Web, and People tabs. Click this button and a sheet appears where you can see information on websites visited, websites blocked, applications launched, and iChats participated in (and with whom). Select an entry—Websites Blocked, for example—and you can see the name of the site along with the day and time it was accessed. Within this log sheet you have the power to allow blocked sites as well as restrict visited sites, launched applications, and iChat buddies.
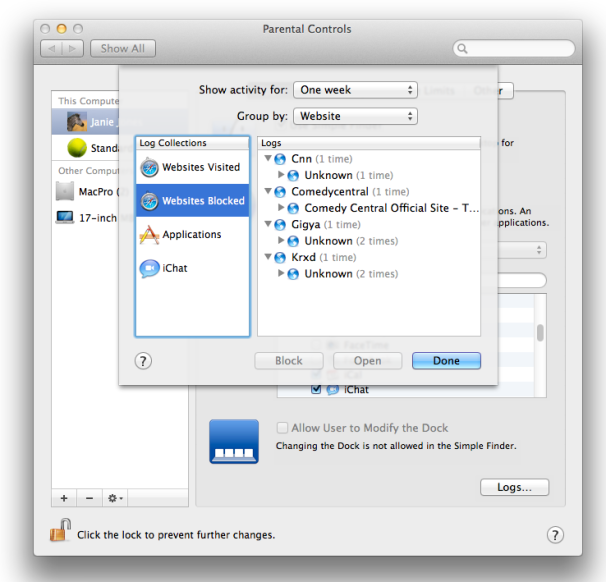
Monitoring Logs: Those in charge of controlled account can see a list of websites visited and blocked by reading the account’s log files.
Sharing a single Mac
As mentioned earlier, thanks to Users & Groups/Accounts, every member of the family can have their own customized account and never have to deal with someone else’s stuff. However, there are times when you want access to that stuff—the music in Junior’s iTunes library or the photos that Dad downloaded to iPhoto. With each family member having a separate Music and Photos folder, how do you share this content? Follow along.iTunes media Although iTunes allows you to listen to music housed on other computers on your network, there’s no option for streaming music from another account on the same computer. Therefore you must make some adjustments to where music is stored on your Mac.
Using an administrator’s account, hold down the Option key and launch iTunes. A message will appear asking you to choose an iTunes Library. In this window click Create Library. In the resulting dialog box navigate to a location available to everyone using the Mac—the Shared folder within the Users folder, for instance—enter a name for your iTunes library (Family Music, for example), and click Save to create the library.
Open iTunes’ preferences, click the Advanced tab, click the Change button, and navigate to the iTunes Media folder within the iTunes library you just created. Make sure that the Copy Files To iTunes Media Folder When Adding To Library option is enabled and click OK to dismiss the preferences window. Choose File -> Add To Library and navigate to the folder where you’ve kept your iTunes media in the past (likely the iTunes folder within the Music folder in your account) and click Open. This will add your media files to this library. Quit iTunes.
Now log into each account that will use this iTunes library and hold down the Option key while launching iTunes. This time click on the Choose Library button. Navigate to the library you created in the Shared folder and click Open. iTunes will open and display the media you added when first configuring iTunes in the original administrator’s account.
When you subsequently launch iTunes in any account, this is the library that will appear. Whenever anyone with access to this library adds media, it will appear for all the accounts that use this library. Note that you must quit iTunes before moving to another account. iTunes will pop-up an error telling you that you can’t access the current library if iTunes is open in another account.
With this setup comes a measure of responsibility. Everyone using this library has the ability to add and delete music. Therefore family members should agree on the rules—no tossing out media and no making inappropriate media available to those who shouldn’t be exposed to it. It’s also a good idea for each family member to create a folder that contains their playlists. To do that, just choose File -> New Playlist Folder, give it an appropriate name, and populate it with your favorite media. That way each family member has access to just the media they want to enjoy, plus it makes syncing iPods and iOS devices easier.
iPhoto libraries iPhoto works in a similar way. To share a single iPhoto library with everyone using the Mac, locate the existing iPhoto library that you’d like to share (it will be in one user’s Pictures folder) and move it to /Users/Shared. Now launch iPhoto with the Option key held down. In the resulting iPhoto window, click the Other Library button and navigate to the iPhoto library that you just moved and click Open. Quit iPhoto and repeat this process for each account. When using Lion you may see a warning that the library is locked and you need to authorize it in order to alter its permissions. Do so and the library will appear within other accounts.
From this point forward, iPhoto will use this image library for every account you’ve configured. Any images added to iPhoto will be available to every account linked to this library. The same warnings apply: Each user must quit iPhoto before another user can access the iPhoto library you’ve shared. Also, any images deleted and permanently thrown away when someone empties iPhoto’s trash are gone for everyone.
Time Machine backups As an administrator, there’s no special magic you have to perform to back up all the user accounts using Time Machine. By default, Time Machine backs up all accounts. If an administrator chooses to, he or she can exclude a particular account by opening the Time Machine system preference, clicking the Options button, and in the resulting sheet clicking the Plus button, navigating to the user folder in question, and clicking Exclude.
When restoring data from a Time Machine backup, each user is limited by their account’s privileges. With a locked down parentally controlled account, for example, that account’s user won’t be able to access Time Machine (though you, as an administrator, can by modifying the account’s limits, do what needs to be done, and then restore those limits). And no user can access the contents of another user’s backed up files from within Time Machine. (However, an administrator can browse a Time Machine backup folder within the Finder, navigate to another user’s folder, and change the privileges on that folder to gain access.)
This article originally appeared as a Macworld Daily Reader iPad exclusive and is now available on bestipadgames.blogspot.com for your enjoyment.


This post was written by: Irfan Jam
Irfan Jam is a professional blogger, web designer and front end web developer. Follow him on Facebook


0 Responses to “How to share one Mac?”
Post a Comment